
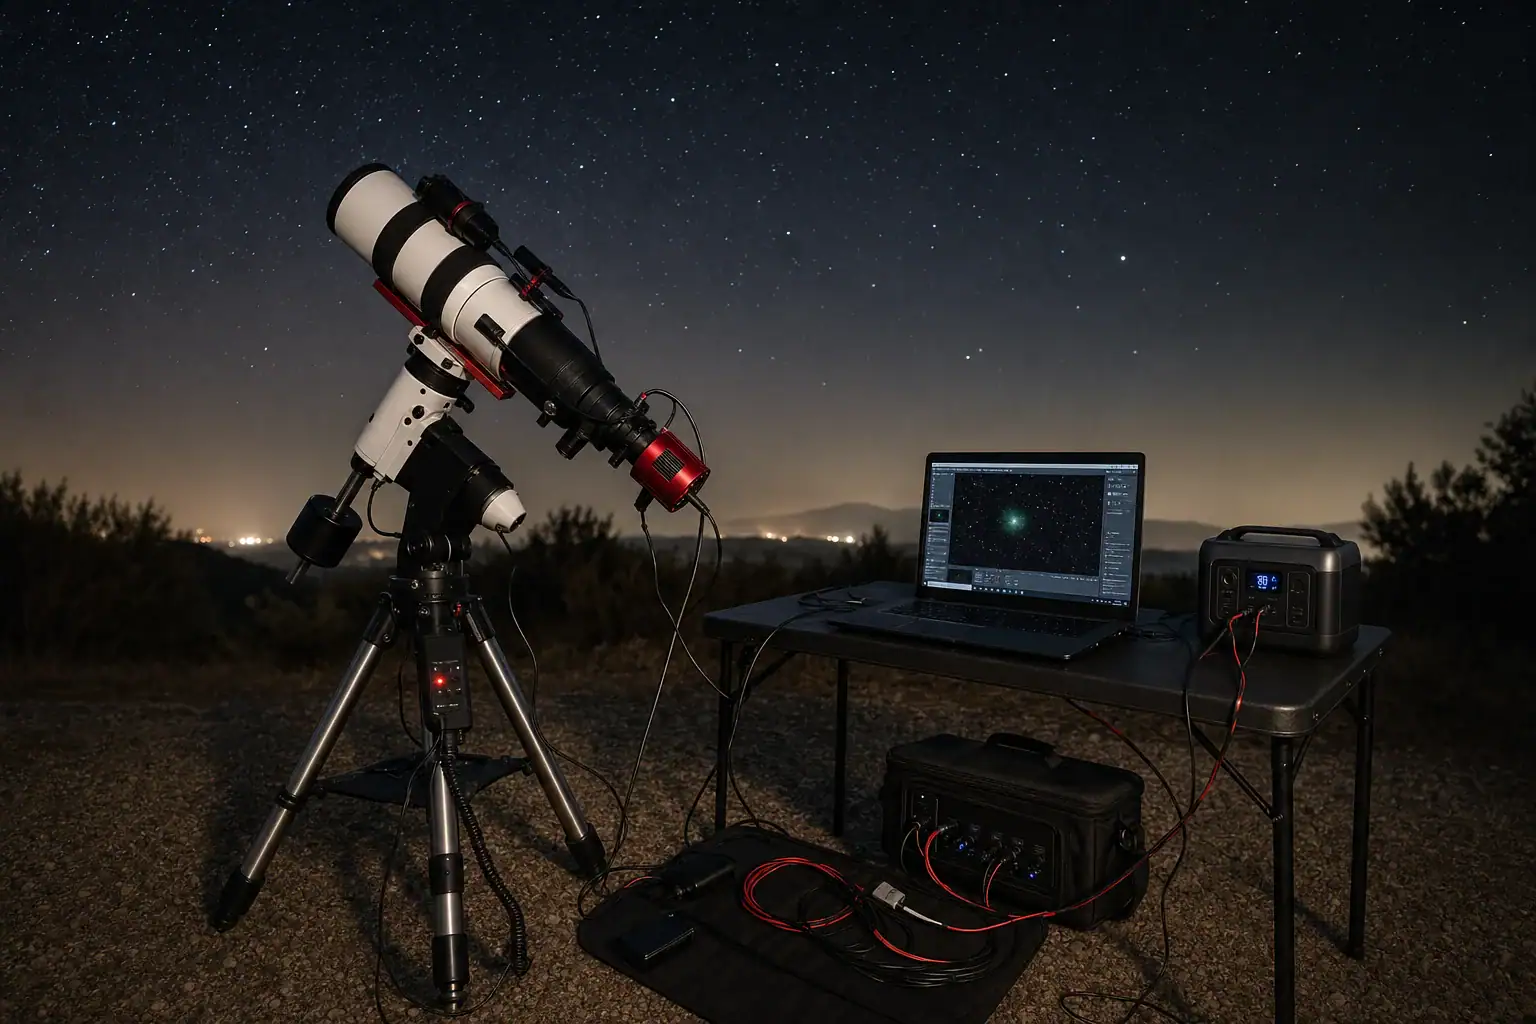
A portable power station for a telescope and astrophotography should provide stable voltage, enough watt-hours for the full observing session, and compatible outputs for every device. A typical setup may include a tracking mount, cooled astronomy camera, guide camera, electronic focuser, mini computer or laptop, powered USB hub, and one or more dew heaters. Although most of these loads are modest, they can run continuously for many hours.
Correct sizing depends on total power draw, expected runtime, inverter efficiency, DC output limits, and cold-weather performance. Dew heater wattage and camera cooling can vary throughout the night, so adding every nameplate rating is not always realistic, but relying only on average consumption can leave too little reserve. The best approach is to estimate energy use in watt-hours, confirm connector and voltage compatibility, and include capacity for colder temperatures, longer sessions, and unexpected equipment demands.
1. What a Portable Power Station Does for an Astronomy Setup
A portable power station is a rechargeable battery system that combines energy storage, protected output circuits, charging electronics, and often an AC inverter. In astronomy, it replaces or supplements vehicle power, small field batteries, and extension cords. Its purpose is not simply to deliver high peak wattage; it must supply clean, dependable power over a long period without interrupting tracking, camera cooling, or computer operation.
Mounts and cameras can be sensitive to low voltage. A mount may appear to work normally while tracking but experience a voltage drop during a fast slew. A cooled camera may draw substantially more power when its thermoelectric cooler is working hard. Dew heaters can become the largest continuous load when several straps are operated at high settings.
Capacity is normally stated in watt-hours, abbreviated Wh. Watt-hours measure stored energy, while watts describe the rate at which equipment consumes energy. A 500 Wh power station does not necessarily deliver all 500 Wh to connected devices. Conversion losses, internal reserve settings, cable losses, temperature, and inverter use reduce available energy.
2. How Loads, Outputs, and Runtime Work Together
Begin by listing every device, its operating voltage, and its approximate power draw. If a label provides volts and amps, estimate watts by multiplying volts by amps. For example, a device using 12 volts at 2 amps draws about 24 watts. For variable loads, use a realistic average and retain additional reserve for brief peaks.
Estimated runtime can be calculated by multiplying rated capacity by an assumed usable-energy factor, then dividing by the average load. A 600 Wh unit with an assumed 85 percent usable delivery provides about 510 Wh. At a 45-watt average load, the theoretical runtime is approximately 11.3 hours. Real conditions may shorten that result.
Direct DC power is usually more efficient than converting battery power to AC and then back to DC through each device’s adapter. However, direct DC should be used only when voltage, connector size, polarity, and output-current limits are confirmed. Many astronomy accessories use nominal 12-volt input, but that does not mean every connector or voltage range is interchangeable.
AC outlets are useful for laptops, proprietary chargers, and equipment without a compatible DC option. The inverter must remain on while AC devices operate, creating its own idle consumption. This overhead matters most when the connected load is small or the session lasts all night.
| Equipment | Possible operating range | Power behavior |
|---|---|---|
| Tracking mount | 5–15 W tracking; 20–50 W slewing | Low average load with short peaks |
| Cooled astronomy camera | 10–35 W | Higher draw during initial cooling or warm weather |
| Guide camera and focuser | 2–8 W combined | Usually intermittent or low continuous demand |
| Dew heaters | 5–25 W per strap | Varies with strap size and controller setting |
| Mini computer | 8–30 W | Changes with processor activity and accessories |
| Laptop | 25–90 W | Depends on charging state, screen, and workload |
3. Real-World Astrophotography Runtime Examples
Consider a lightweight imaging system with a mount averaging 8 watts, an uncooled camera and guide system using 6 watts, a mini computer drawing 12 watts, and a dew heater averaging 10 watts. The combined average is about 36 watts. For an eight-hour session, the equipment needs roughly 288 Wh before conversion losses and reserve are included. A practical capacity target would be higher than this calculated minimum.
A cooled deep-sky setup may average 10 watts for the mount, 25 watts for the main camera, 5 watts for guiding and focusing, 18 watts for a computer, and 25 watts for two controlled dew heaters. That is an average of about 83 watts. Over ten hours, energy consumption reaches approximately 830 Wh before accounting for losses, temperature, or spare capacity. In this situation, rated inverter wattage is unlikely to be the limiting factor; battery capacity is more important.
A laptop can materially change the calculation. If the astronomy equipment averages 55 watts and a laptop adds 45 watts, the total becomes 100 watts. A nominal 1,000 Wh unit delivering an assumed 850 Wh could run that load for about 8.5 hours under favorable conditions. Charging the laptop before leaving home, reducing screen brightness, or using an efficient compatible DC or USB-C connection can extend field runtime.
Dew conditions are difficult to predict. On a dry night, controlled heater straps may cycle at low output. In humid conditions, larger straps may operate much harder. Estimate both a normal case and a demanding case. A power station that barely covers the normal estimate offers little protection against heavy dew, colder weather, or an unexpectedly long imaging sequence.
4. Common Sizing Mistakes and Troubleshooting Cues
Confusing watts with watt-hours: An output rated for hundreds of watts may easily start the equipment but still have insufficient energy for an overnight session. Output wattage indicates how much load can be supported at once; watt-hours indicate how long that load may run.
Using only maximum nameplate current: Adding maximum current ratings can exaggerate average consumption, but ignoring those ratings can miss startup and slew peaks. Use measured or realistic average draw for runtime, then confirm that each output can handle the maximum expected current.
Assuming every 12-volt port is the same: Some outputs are regulated near 12 volts, while others vary with battery state. If a mount resets during slewing or a camera disconnects when cooling increases, check for output-current limits, voltage sag, loose connectors, undersized cables, or shared-port limits.
Ignoring inverter overhead: Shorter-than-expected runtime may result from powering several low-voltage devices through AC adapters. The inverter’s idle draw and each adapter’s conversion losses consume additional energy.
Overlooking automatic shutoff: Some power stations turn off an output when the load is very low. This can affect a mount used alone or accessories that cycle off for long periods. Look for configurable timeout behavior or an output designed to remain active.
Testing only indoors: A system that works at room temperature may deliver less runtime in the cold. Before a critical trip, test the complete setup for several hours and watch the power station’s remaining capacity, output watts, and any device warnings.
5. Electrical and Field Safety Basics
Keep the power station dry, ventilated, and protected from direct dew, frost, dust, and tripping hazards. Do not seal it in an airtight container while it is operating or charging. Place it on a stable surface where connectors cannot be pulled sideways by moving telescope cables.
Confirm voltage, polarity, connector dimensions, and current requirements before using any DC cable. Similar-looking barrel connectors may have different dimensions or polarity. Use fused, purpose-appropriate cables and avoid damaged adapters, loose splitters, and long undersized conductors that can create heat or voltage drop.
Do not exceed the rating of an individual port or a group of ports that share a combined limit. The total output rating of the power station does not guarantee that one DC connector can provide all of that power. Stop using equipment that develops unusual heat, odor, swelling, noise, or repeated fault messages.
Recharge with compatible equipment and follow the manufacturer’s temperature and ventilation guidance. Do not open the power station, modify its battery, defeat protective circuits, or improvise connections to household electrical systems. Any permanent electrical installation should be evaluated by a qualified electrician.
6. Maintenance, Charging, and Storage Between Sessions
Recharge after field use rather than storing the unit nearly empty. For long-term storage, use the charge level and inspection interval specified for the battery system; many units are best stored partially charged rather than continuously held at zero or 100 percent. Check the state of charge every few months because standby electronics can slowly consume energy.
Store the power station in a dry, moderate-temperature location away from direct sunlight and combustible clutter. Allow a cold unit to return to an appropriate charging temperature before recharging. Condensation can form when equipment is moved from a cold field into a warm room, so keep ports dry and wait if moisture is present.
Inspect cables, barrel connectors, USB leads, and adapters before each trip. Label cables with voltage, polarity, and destination to reduce setup errors in the dark. Periodically run a realistic load test and compare delivered runtime with earlier results. A gradual decline may indicate normal aging, while a sudden change can point to a cable, adapter, temperature, or output-setting problem.
| Maintenance item | Practical check |
|---|---|
| Before a trip | Charge fully as needed and test all required outputs |
| After field use | Dry surfaces, inspect ports, and recharge appropriately |
| During storage | Check charge periodically and avoid temperature extremes |
| Seasonally | Perform a load test and inspect every cable and adapter |
Related guides: Portable Power Station Buying Guide • How to Choose the Right Size Portable Power Station • AC vs DC Power: How to Maximize Efficiency and Runtime • Cold-Weather Capacity Loss: How Much Power You Really Lose
7. Practical Takeaways and Specs to Look For
Size the system around energy consumption rather than headline output wattage. Calculate an expected watt-hour requirement, include all-night loads such as computers and dew heaters, and retain roughly 20 to 30 percent reserve when practical. More reserve may be appropriate for freezing conditions, remote locations, or multi-night use without reliable recharging.
Whenever possible, measure the complete setup during a representative session. A plug-in meter can help with AC loads, while suitable inline meters can measure compatible DC equipment. Compare the observed average and peak demand with the limits of each intended output, not just the power station’s overall rating.
Specs to look for
- Battery capacity: Look for roughly 300–500 Wh for modest systems or 700–1,500 Wh for cooled cameras, computers, and multiple heaters; capacity determines overnight runtime.
- Usable energy: Look for test data or displays that support realistic planning at about 80–90 percent of rated capacity; conversion losses reduce delivered watt-hours.
- Regulated DC output: Look for stable voltage near the equipment’s required range and enough current for combined loads; stable output helps prevent mount resets and camera disconnects.
- Individual port current: Look for at least the maximum current required by the connected device, such as 5–10 amps on a shared 12-volt circuit; overall wattage alone does not define port capability.
- AC inverter output: Look for continuous wattage comfortably above the combined AC load, often 200–500 watts for astronomy equipment; margin accommodates adapters and laptop charging peaks.
- Low inverter idle draw: Look for efficient low-load operation or the ability to disable unused AC outputs; idle consumption can noticeably shorten an overnight session.
- USB-C Power Delivery: Look for compatible profiles such as 60–100 watts when powering a laptop or mini computer; direct USB-C operation may avoid an extra conversion stage.
- Cold-weather operating range: Look for discharge specifications that cover expected observing temperatures and protected charging behavior near freezing; cold reduces available capacity and can restrict charging.
- Output controls and display: Look for separate AC, DC, and USB controls plus real-time watts and estimated runtime; clear monitoring makes unexpected consumption easier to diagnose.
The most suitable power station is one that supports every required voltage and connector, handles brief peak loads, and provides enough usable energy for the longest likely session. A conservative estimate, verified with a full-system test, is more dependable than choosing solely by advertised wattage.
Frequently asked questions
How many watt-hours do I need to run a telescope setup all night?
Calculate the average wattage of every device and multiply it by the planned session length in hours. Then allow for conversion losses and a reserve of roughly 20 to 30 percent, with more margin for cold weather, heavy dew, or uncertain loads. A modest setup may need several hundred watt-hours, while a cooled camera, computer, and multiple dew heaters can require substantially more.
Can I power a telescope mount directly from a portable power station?
Yes, if the station provides an output with the correct voltage, polarity, connector type, and current capacity for the mount. Check whether the DC output is regulated and whether its individual or shared-port limit can support slewing peaks. Use an appropriate cable rather than assuming that all 12-volt connectors are compatible.
What power station specs matter most for astrophotography?
Usable battery capacity in watt-hours, regulated DC output, individual port current limits, compatible connectors, and cold-weather performance are key considerations. Also check AC inverter efficiency and idle draw if adapters or a laptop must run from AC. A display showing real-time watts and estimated runtime can make field monitoring easier.
What is the most common mistake when choosing a power station for astrophotography?
A common mistake is choosing based on the station’s maximum watt output instead of its watt-hour capacity. A unit may have enough peak output to run the equipment but not enough stored energy for an overnight session. Another frequent issue is overlooking inverter losses when several low-voltage devices are powered through AC adapters.
Will dew heaters drain a portable power station quickly?
They can, especially when several straps operate at high settings in humid or cold conditions. Their actual energy use depends on strap size, controller settings, and how often they cycle. Include a normal and high-demand dew-heater estimate when planning battery capacity.
Is it safe to use a portable power station outside for astronomy?
It can be safe when the unit is kept dry, ventilated, and on a stable surface away from dew, standing water, and trip hazards. Confirm cable voltage, polarity, and current ratings before connecting equipment, and do not exceed individual-port limits. Avoid damaged cables, improvised wiring, and charging or operating the station outside its specified temperature conditions.
Related guides
Browse this topic →
- Beginner-friendly sizing, runtime & specs
- Solar & charging (MPPT, fast charging, cables)
- Batteries (LiFePO4, cycles, care & storage)
- Safety, cold-weather performance, real-world tips
More in Beginners
See all →- Portable Power Station for a Gaming PC: Runtime, Load Spikes, and UPS Considerations
- Portable Power Station for a Pop-Up Camper: Lights, Fans, Fridge, and Recharge Plan
- Portable Power Station for a Shed or Outbuilding: Lights, Chargers, and Security
- Portable Power Station for a Boat: 12V Loads, Salt Air, and Safer Storage
- Portable Power Station for a Small Jobsite: Tool Battery Chargers and Work Lights
Keep reading
About this site
Portable Energy Lab publishes practical, independent guides about portable power—clear sizing, safe use, and real-world expectations.
Affiliate disclosure
Some links on this site may be affiliate links. If you buy through these links, we may earn a small commission at no extra cost to you. This helps support our content. Read our affiliate disclosure.